Throne has it been a long time! And what have I so accomplished in such a lengthy period of seemable stagnation? Suppose I’ll have to show you, won’t I?
The Painting: Land Raider Crusader posts
Painting: Land Raider Crusader – Part 1
Painting: Land Raider Crusader – Part 2
Painting: Land Raider Crusader – Part 3
Painting: Land Raider Crusader – Part 4
Painting: Land Raider Crusader – Part 5
Painting: Land Raider Crusader – Part 6
Since last time
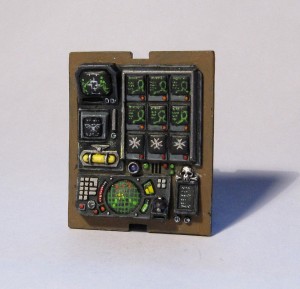
So, what HAVE I been doing? Not all too much if I am to be honest, at least not Warhammer 40K-related, that is. Apart from finishing the University semester and working both week and weekend, I won’t bore you with the details. The point, or rather the essence to extract from all this is that I’ve done SOMETHING, and that I have completed enough pieces to warrant a fresh post. Having painted the internal side doors and system panel, the Land Raider interior is more or less finished. Take a look:

Assembled, but not yet glued together, the overall impression of the interior is both solid and detailed.

I don't think I've ever put this much time and effort into a single piece, but the result is something I pride myself in.
How did I do that?
The first thought I had when starting on the system panel was that it shouldn’t end up too colourful. Afer all, this is a tactical Astartes workspace, not some flashy Eldar shrine. Also, I figured the panel itself should be toned-down and neutral. In real life this would be not to steal attention from the lights and monitors. So I kept the panels Chaos Black, and made sure not to stray too much away from greens and reds for the rest. Notice how this makes the white, yellow and blue stand out. The text and figures on the screens are mostly Scorpion Green, but the grid on the circular monitor is Goblin Green, and the marked-out spot Sunburst Yellow. The small “half-globe” in the lower rightmost corner of the lowest panel (am I being too precise?) was carefully blended with some Liche Purple and a touch of Ultramarines Blue towards the edge. I figured it to be some hologram-pad, and simply chose to paint it “inactive”.
Designating the upmost monitor as a “target screen” for the hurricane bolters was an idea I had from the start, but failed to create a split-screen-effect to show the aim of both turrets. Instead I figured the two buttons underneath the monitor would be used to swich between different views, and so ended up with showing the crosshairs of only one turret. The result is pleasing though, as I was quite lucky with the posing of the two targets. The monitor-group to the right shows the status of the passengers, in this case a squad of Sword Brethren Assault Terminators lead by a Terminator Chaplain (hopefully coming up in the foreseeable future). The three remaining monitors were given Templar screensavers.
What more since last time?
What? You actually thought that was it? In FOUR months? I am genuinly insulted (thereby diverting attention away from the fact that it’s actually been four months since my last post).
That’s right, I’ve been painting Boltguns for the interior rack. And why not document the process? In the images below you’ll see the process from the first layer to the final touch!
- The fist step was coating all the metal in Boltgun Metal, except for the ornament, which is Tin Bitz.
- The second step was to clean up the spill a little, and then apply a thorough (ultra secret) wash.
- The third step was to drybrush the Boltgun Metal-area with Chainmail.
- The fourth step was painting the casing Graveyard Earth and highlighting the ornament with Brazen Brass.
- The fifth, and finishing step was to drybrush the casing with Dheneb Stone and adding final highlights with Mithril Silver and Shining Gold.
- Here is another finished boltgun that is somewhat different in the shading.
How did I do THAT then?
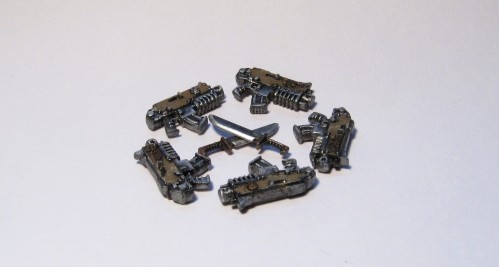
To add to the information from the images, I did indeed apply a second, modest, wash over the drybrushed Chainmail. After this I simply overbrushed with more Chainmail before the final highlight. A thin wash, or rather glaze, was applied to the ornament after highlighting with Shining Gold, this to tone down the yellow in the colour. The reason I use drybrushing for highlighting at all, rather than overbrushing, is to create a weathered look. Believe it or not, the Black Templars DO get to use their equipment, however rare and blessed it might be. Some combat knives that I plan to use as bayonets were also finished alongside the guns. The blade edge is Mithril Silver, otherwise Boltgun Metal. The grip is Tin Bitz highlighted with Brazen Brass. The final result on all the pieces can be seen below:

The finished Boltguns. Only three will fit in the gun rack. The remaining two will come to some use, I'm sure.
Basic tips’n tricks
When painting freehand details, you’ll need a sharp point on your brush. This means that there can’t be too much paint on it, but if you simply “prick” the paint pot to get that tiny drop, you’ll most likely find the paint drying before you are able to apply it to the miniature. In this case, you must find the optimal amount of water to thin the paint with. Too much water and it’ll run and become a wide streak on the model, too little water and it’ll dry too early or be left in a too-thick layer. You can usually tell you’ve got it when you dip the brush and it soaks up the paint without swelling. Swelling means too much water, while too thick paint will simply form a layer around the bristles without soaking.
The paint will dry pretty fast anyway, so don’t expext to get too much done without re-dipping. My advice is to always replace the paint completely, washing your brush in a water pot between each and every time. Too much work? Stick to transfers! (…get it?)
Next time
I’ll continue modelling the Land Raider, and adding a few finishing touches to the interior (varnish), but a book-, or game review should also be manageable.
Comments in both English and Norwegian are appreciated!


December 30th, 2011 at 3:39 pm
Hi, i’ve just started painting a land raider for my ultra marines army. really enjoyed seeing how you’ve done your interior for your tank. i’m looking forward to seeing more.
January 2nd, 2012 at 7:09 pm
Thanks a lot! As you can probably see, it’s been quite a while since my last reported activity, and, truth be told, I have done little more than assemble and basecoat the Land Raider at this point. Among the distractions are the new Necron codex and Relic’s awesome game Space Marine, but I am aware this offers little excuse. Tell you what; thanks to your interest I’ll make sure to post an update within the week!
August 14th, 2011 at 10:04 pm
DO A SPACE MARINE ULTRA MARINE LANDRAIDER
August 17th, 2011 at 2:40 pm
By that, do you mean a regular Land Raider with Lascannons, a Termunus-pattern Land Raider, or simply a Land Raider with Ultramarines iconography?
Regardless; for the time being I don’t have the need nor the money for an additional Raider, and if I did I would have no other intention but to stay faithful to the Black Templars. So my answer must, regrettably, be no. My student budget does not allow me aquiring miniatures beyond the range of what I need for my two existing armies. 😉