Painting: Land Raider Crusader – Part 7

Throne has it been a long time! And what have I so accomplished in such a lengthy period of seemable stagnation? Suppose I’ll have to show you, won’t I?

Struggling to find something new? Patience! All shall be revealed in time.

The Painting: Land Raider Crusader posts

Painting: Land Raider Crusader – Part 1
Painting: Land Raider Crusader – Part 2
Painting: Land Raider Crusader – Part 3
Painting: Land Raider Crusader – Part 4

Painting: Land Raider Crusader – Part 5
Painting: Land Raider Crusader – Part 6

Since last time

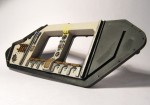
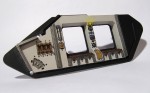
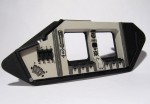
So, what HAVE I been doing? Not all too much if I am to be honest, at least not Warhammer 40K-related, that is. Apart from finishing the University semester and working both week and weekend, I won’t bore you with the details. The point, or rather the essence to extract from all this is that I’ve done SOMETHING, and that I have completed enough pieces to warrant a fresh post. Having painted the internal side doors and system panel, the Land Raider interior is more or less finished. Take a look:

Assembled, but not yet glued together, the overall impression of the interior is both solid and detailed.

I don't think I've ever put this much time and effort into a single piece, but the result is something I pride myself in.

How did I do that?

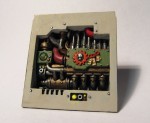
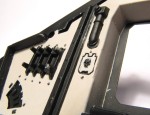
The first thought I had when starting on the system panel was that it shouldn’t end up too colourful. Afer all, this is a tactical Astartes workspace, not some flashy Eldar shrine. Also, I figured the panel itself should be toned-down and neutral. In real life this would be not to steal attention from the lights and monitors. So I kept the panels Chaos Black, and made sure not to stray too much away from greens and reds for the rest. Notice how this makes the white, yellow and blue stand out. The text and figures on the screens are mostly Scorpion Green, but the grid on the circular monitor is Goblin Green, and the marked-out spot Sunburst Yellow. The small “half-globe” in the lower rightmost corner of the lowest panel (am I being too precise?) was carefully blended with some Liche Purple and a touch of Ultramarines Blue towards the edge. I figured it to be some hologram-pad, and simply chose to paint it “inactive”.

Designating the upmost monitor as a “target screen” for the hurricane bolters was an idea I had from the start, but failed to create a split-screen-effect to show the aim of both turrets. Instead I figured the two buttons underneath the monitor would be used to swich between different views, and so ended up with showing the crosshairs of only one turret. The result is pleasing though, as I was quite lucky with the posing of the two targets. The monitor-group to the right shows the status of the passengers, in this case a squad of Sword Brethren Assault Terminators lead by a Terminator Chaplain (hopefully coming up in the foreseeable future). The three remaining monitors were given Templar screensavers.

What more since last time?

What? You actually thought that was it? In FOUR months? I am genuinly insulted (thereby diverting attention away from the fact that it’s actually been four months since my last post).

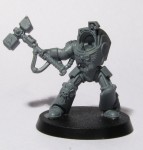
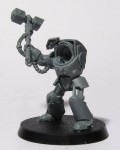
These Bolters are actually for the Land Raider interior, more specificly the rack in the entrance.

That’s right, I’ve been painting Boltguns for the interior rack. And why not document the process? In the images below you’ll see the process from the first layer to the final touch!

How did I do THAT then?

To add to the information from the images, I did indeed apply a second, modest, wash over the drybrushed Chainmail. After this I simply overbrushed with more Chainmail before the final highlight. A thin wash, or rather glaze, was applied to the ornament after highlighting with Shining Gold, this to tone down the yellow in the colour. The reason I use drybrushing for highlighting at all, rather than overbrushing, is to create a weathered look. Believe it or not, the Black Templars DO get to use their equipment, however rare and blessed it might be. Some combat knives that I plan to use as bayonets were also finished alongside the guns. The blade edge is Mithril Silver, otherwise Boltgun Metal. The grip is Tin Bitz highlighted with Brazen Brass. The final result on all the pieces can be seen below:

The finished Boltguns. Only three will fit in the gun rack. The remaining two will come to some use, I'm sure.

Basic tips’n tricks

When painting freehand details, you’ll need a sharp point on your brush. This means that there can’t be too much paint on it, but if you simply “prick” the paint pot to get that tiny drop, you’ll most likely find the paint drying before you are able to apply it to the miniature. In this case, you must find the optimal amount of water to thin the paint with. Too much water and it’ll run and become a wide streak on the model, too little water and it’ll dry too early or be left in a too-thick layer. You can usually tell you’ve got it when you dip the brush and it soaks up the paint without swelling. Swelling means too much water, while too thick paint will simply form a layer around the bristles without soaking.

The paint will dry pretty fast anyway, so don’t expext to get too much done without re-dipping. My advice is to always replace the paint completely, washing your brush in a water pot between each and every time. Too much work? Stick to transfers! (…get it?)

Next time

I’ll continue modelling the Land Raider, and adding a few finishing touches to the interior (varnish), but a book-, or game review should also be manageable.

Comments in both English and Norwegian are appreciated!


Painting: Land Raider Crusader – Part 6

Maybe not my most extensive update, the changes to the Land Raider interior are still significant enough to warrant a new painting post.

I've rarely been more happy with the general detailwork

The Painting: Land Raider Crusader posts

Painting: Land Raider Crusader – Part 1
Painting: Land Raider Crusader – Part 2
Painting: Land Raider Crusader – Part 3
Painting: Land Raider Crusader – Part 4

Painting: Land Raider Crusader – Part 5
Painting: Land Raider Crusader – Part 7

Since last time

To be honest, it’s actually been a while since I completed this painting session, but a somewhat hectic schedule has kept me from posting. That, and the fact that I wanted to finish the book review of Prospero Burns first, so that the recent post history of WBaB wouldn’t just be a long list alternating between painting and modelling. But enough of all that, let’s just take a quick peek at what’s new, shall we?

How did I do that?

Okay, so the right interior side is finally finished, along with the engine and ramp parts. Well, almost finished, I still plan to attach some boltguns to the rack on the right interior piece. Also, a couple of screens are to be gloss-varnished, I didn’t want to do this before the fotoshoot considering that the light reflections would obscure the details. When it comes to the painting, all the metal parts have been washed, but only the engine parts were left that way. This is just to make the them look realisticly dirty. The rest was drybrushed Chainmail, except the skulls and smaller details; these were overbrushed Mithril Silver. I’m really happy with the small lenses/lamps on the engine control panel (especially the blue one), as I think the highlight blending gave just the right look. My purity seals/parchments are also improving, these were started with Bestial Brown and so more and more Bleached Bone was added to the mix. The data on the information screen was carefully drawn in with Scorpion Green and Sunburst Yellow.

When it comes to the freehand on the display (see picture number 2) I gave the top of the mountain a distinct shade with some heavily watered down Black Ink. This made a nice contrast to the light blue sky. The blue is Ultramarines Blue, mixed with increasing amounts of Skull White as it gets closer to the mountain. The ground was highlighted with a mix of Dark Flesh and Bestial Brown until the bottom was pure Bestial Brown (with a little Bleached Bone). The lower ramp was included in the main picture simply to show that the red and green lamps are ready, the green lamp flashing to indicate that the ramp is opening and it’s about time to start the killing.

Basic tips n’ tricks

To illustrate perspective depth in landscapes when doing freehand, remember that the ground gets lighter the closer to the observer it is, while it’s the other way around with the sky. The lenses, no matter the colour, are created starting with a fairly dark version of the colour, then blend in a somewhat lighter version diagonally upwards in the direction of your choise. Then add a line of a much lighter version of the colour in the bottom corner, and, to finish, add a tiny dot (or two) of Skull White in the opposite to illustrate reflection.

Next time

Not quite sure actually. I’ll be working on the Land Raider, of course, but there’ll probably be a game review or something before that. Also, a new Marine should soon be added to the model gallery. Stay tuned!

Comments in both English and Norwegian are appreciated!


Book review – Prospero Burns

The newest installment in the Horus Heresy series provides a perfect counterweight to its slightly older twin.

The artwork of Prospero Burns. Image: Black Library

Author: Dan Abnett
Series: The Horus Heresy
Release: January 2011

Image: Black Library

For the first time since starting With Boltgun and Brush, I’ve finally been able to finish a relatively new book. So instead of starting the long process of reviewing the entire Horus Heresy series, book by book, chronologically, I felt like creating something  more applicable to date (stretching my English here, feel free to correct if necessary). Also, having just recently finished it, I’ll obviously stand a better chance of producing a review inspired by fairly raw impressions and thereby enthusiasm.

Let’s get one thing straight from the very beginning: When reading the material of Dan Abnett you can always rest assured that you are in able hands. Perhaps the finest author of the entire Black Library, Abnett is foremost a master in the creation of characters. But also when it comes to environments and dramatical, well-balanced storylines does he truly excell. A recognisable trait you’ll notice in Prospero Burns is the author’s seemable penchant for placing the point of view with “ordinary” humans rather than Space Marines. Even though this wasn’t completely the case with his first Heresy-novel, Horus Rising, I think Abnett prefers a measue of mystique when it comes to the Adeptus Astartes. I tend to agree, also because this is unquestionably dangerous terrain (get it?). Several authors have burned themselves depicting certain Astartes as overly naive, antagonistic or simply caricatured.

Leman Russ - Primarch of the Vlka Fenryka (Space Wolves) Image: primarchs.mosaicglobe.com


But back to the story at hand. This is a tale of wolves. The Emperor’s self-proclaimed executioners, His most unrelenting warriors; the Space Wolves. It is the story of Prospero’s fall, the home world of the Thousand Sons assaulted and all but annihilated as a harsh response to Magnus the Red’s misguided actions to warn the Emperor of the coming heresy. It’s just as tragic as it sounds, but for the more general description of the epic Astartes vs Astartes battle itself, you should seek out A Thousand Sons (Graham McNeill), the so called series-twin and predecessor of Prospero burns. The storylines of these books run parallell, but they focus on somewhat different aspects (apart from describing two different Legions). Prospero Burns tells us a lot more about the Space Wolves themselves, than the conflict with the Thousand Sons, but at the same time this helps us better understand why it happened as it did. A kind of balance is restored, as it becomes clear where the real fault lies. I think I’ll leave it at that.

Getting to understand the warriors of Fenris at a deeper level than ever before, all the while being served new insight into the Horus Heresy itself, and having all of it wrapped into the exceptional writing quality of Dan Abnett, is no less than a real treat. Reading A Thousand Sons prior to this book should be compulsory though, unless you are bent on experiencing the story in a more unorthodox way. Much like watching the newest Star Wars films before the old ones; once you’ve done it, you can’t undo it.            

Comments in both English and Norwegian are appreciated!


Modelling: Sword Brethren Terminator Assault Squad – Part 2

The passengers for the Land Raider Crusader are finally here, and looking pretty good, which you can always count on me to be saying myself.

Quite a bit more detail added since last time!

Since last time

Well, as you can clearly see by comparing this post with the previous one of the same type, a fair amount of progress has been made. In fact, unless I come up with any brilliant new modelling ideas, I’d say they’re all ready for a session of spraypaint at this point. Let’s have a closer look at what I’ve done, shall we?

Why did I do that?

As there’s not supposed to be a sergeant in this squad, the fancy sergeant parts were (tactically) spread around to all of them. I’m happy with the amount of detail and personality they’ve all ended up with, but the process of creating a dynamic pose for these models is not particularly easy. I always wondered why the Terminators depicted on the box cover all looked so little, well, lively. The answer is that if you want every piece to fit optimally when gluing them into place, this is how you HAVE to pose them. Especially the small shields that are to be attached to the left shoulderguards (optional, I know) fit terribly if you tilt the arms above “oh my shield is so damn heavy-height”, or make the heads look more than 45° to the left. This annoyed the s*** out of me, but the end result was quite acceptable. Live and learn I guess, I just don’t want any of my Marines to look like they’re bored or stopping to answer a call of nature in-suit.

Basic tips n’ tricks

I made a deliberate choice when I decided to stuff my models full of accessories, part because I wanted them to look like decorated veterans, part because I just don’t view the Black Templars as especially minimalistic. Just remember that you don’t HAVE to use EVERY single sprue part, and that doing so contributes strongly to the overall look of the army.

Next time

Well, hopefully a game- or book review. If not, the next stage of painting on the Crusader. Stay tuned!

Comments in both English and Norwegian are appreciated!


Painting: Land Raider Crusader – Part 5

To quote the last thing you’ll ever hear after turning your back on a presumably dead Necron Warrior, wounded with a weapon that allows armor saves:

/I AM BAAAAAACK!// 

The left side is finished, so consult earlier posts if you haven't seen it yet.

The Painting: Land Raider Crusader posts

Painting: Land Raider Crusader – Part 1
Painting: Land Raider Crusader – Part 2
Painting: Land Raider Crusader – Part 3
Painting: Land Raider Crusader – Part 4

Painting: Land Raider Crusader – Part 6
Painting: Land Raider Crusader – Part 7

Since last time

Alright, so this first post of 2011 is by no means a testament to what I am normally able to accomplish in a period of time as long as it has been since last time. Christmas, and all that followed, proved to distract me more than originally anticipated. But now, as stated earlier, I’m back, and itching to resume buisness. After almost going insane trying to come up with a colour system for the engine compartment, I finally managed to slap myself in the face and get started. The unfinished right side of the interior, and the assault ramp, have also been recieving some much-needed attention:

How did I do that?

Pretty much the only things new on the right interior side are the gun rack and panel screen. The rack was started with Dark Flesh, then highlighted with Graveyard Earth. One more highlight on that one, and attaching some boltguns, and it should be finished. The screen is a little more work, but putting a lot of effort into it would probably be a waste of time. The ground is so far Dark Flesh, the sky Ultramarines blue, and the road a 4:1 mix of Chaos Black and Skull White. I plan to finish the whole thing with a coat of Gloss Varnish. The engine did indeed take some time, and still there are colours missing. Also, all the metallics will be recieving my “ultra secret metal wash”. The panels will remain black, or get painted gray, I haven’t decided yet, and the Mechanicum logo will be red with a silver or golden skull. The “bulb”, which I THINK is a screen (help me out here?), will require some more thinking. It COULD be a fuel indicator, in which case I only need to discern the colour of Prometheum…

Basic tips n’ tricks

When painting engine parts, like the one described above or, for example, those of a Space Marine Bike, try to resist the temptation of simply drybrushing everything Boltgun Metal, all the while making sure not to get TOO colourful. Colours are used to make out the difference between metal and plastic, tubes and joints, actual engine parts and protective panels. Knowledge of engines is by no means necessary, simply use your imagination. After all, the 41st milennium is more like old Sovjet Russia, where panels are metal and engines are plastic, and where you don’t paint the Land Raider; the Land Raider paints YOU! Which, on occation, it probably will…

Next time

Probably an insight in the process of shaping the Terminators seen last time. Also, I’m thinking of a new game review. Time will show.

Comments in both English and Norwegian are appreciated!


Modelling: Sword Brethren Terminator Assault Squad

Not to worry, the Land Raider has not been forgotten, but making sure the passengers will be ready at the same time seemed like a good idea.

So far, so good! And I guess you can spot what I've got in the background?

Since last time

While painting the Land Raider Crusader, I felt like starting on the passengers at the same time. That way the blog gets more varied posts, and I get to prove that I’m capable of multitasking! And the objects in the background of the picture? Yep, that’s right! I’ve got Forgeworld Black Templars Terminator Storm Shields!! Really looking forward to both attaching and painting them. But not all of them will belong to the Terminators. As you can see, one of them has a pair of Lightning Claws. I’ll explain more after the images:

Why did I do that?

I wanted at least one Terminator with Lightning Claws, first of all so that not all of them would have Initiative 1. To have one Terminator capable of three attacks that are all Initiative 4, ignores Armour Saves and re-roll To Hit, should be good for dealing with a larger number of foes, or a not-so-tough (but fast), multi-wound character. Also, I really wanted to spend the pair of Claws in the sprue that are longer than the others (normally meant for the Sergeant). The surplus shield will be given to a character, or modified to fit as decoration on a vehicle (the Land Raider?).

I’m quite happy with the posing so far, but my ideas will be more evident when the heads are in place. For the details I have Templar shoulder pads from the Black Templars Chapter Upgrade pack, and also some Etched Brass Black Templars Symbols from Forgeworld.

Basic tips n’ tricks

When posing, try to get some variety in the angle of the torsos. That way you’ll be able to choose arms that “match”, and together create a particular stance. When trying out different arms, don’t be too quick to glue after picking a pair. Try out different “tilts”, especially if the model is to have a weapon/shield in each arm. Think about which way the head is to face, and imagine yourself being the model. Why not try the pose yourself? If you have problems keeping your balance, you might have to re-think the pose (or get a jetpack if the model is flying). 

Next time

The Land Raider? Probably…maybe…possibly…we’ll see!

Comments in both English and Norwegian are appreciated!


Painting: Land Raider Crusader – Part 4

Finally finished with the first passenger side of the interior, and well on the way with the rest, I can finally sight the end of the first part of painting. Well, barely glimpse it would perhapse be more accurate.

As you can see, the engine has now been included in the process. Bit of a challenge that one, if you intend to be thorough.

The Painting: Land Raider Crusader posts

Painting: Land Raider Crusader – Part 1
Painting: Land Raider Crusader – Part 2
Painting: Land Raider Crusader – Part 3
Painting: Land Raider Crusader – Part 5
Painting: Land Raider Crusader – Part 6
Painting: Land Raider Crusader – Part 7

Since last time

First of all: It’s not my thing to start off making all sorts of creative excuses for the post being late, so let’s just say I’ve been otherwise occupied and be done with it. Buy it if it’s within your good graces to do so. So anyway, there has been some development on the Land Raider interior, as both the introductory text and image suggests. Most of it very pleasing, some less. Before I forget though; be advised that a new model has entered the model gallery, so why not stop by when you’re finished here?

How did I do that?

The first image shows you the right passenger side,  now all cleaned up and given a few coats of Boltgun Metal. The left side is, as I’ve mentioned, completely finished, except for varnishing (yes, I DO bother with this, so don’t even BOTHER asking). The shrine will, after some consideration (hardly any), most likely remain black and empty. The metallics were drybrushed with Chainmail, the seats highlighted with Bestial Brown and all the studs tipped with Mithril Silver. The keypad in the foremost compartment is mostly Skull White, and otherwise Scorpion GreenBlood Red and Goblin Green. The small “backlighting effect” attempted on these last keys were achieved using, respectably, heavily watered down Sunburst Yellow, Blazing Orange and Scorpion Green. You probably didn’t even notice it before I told you, but I consider it practise.

One thing I’m less pleased with is the metal skull seen on the panel in the third picture. Like the rest of the metallics, it was highlighted by drybrushing on Chainmail. And on such a tiny object the drybrushing proved to obscure a lot of detail. So what I SHOULD have done was using the overbrushing technique, as practised upon the Imperial Eagle seen in the last picture. That one I’m really happy with, so the trick will be not to spoil it with the next highlight.

Basic tips n’ tricks

The overbrushing technique is all about using a fairly dry brush and applying very little pressure. Dip the brush in the paint, without watering it down first, and then stroke off most of the paint, preferrably leaving the brush nice and flat. Now you can carefully apply the paint to the model, for example a grille or chainmail armour, without the paint running into any cracks. It is, in principle, about the same as drybrushing, but doesn’t leave a “chalky” result (somtimes this is preferable though). It is more gentle with tiny detail, but not the best if the goal is a subtle and seamless coat (like on the body of my Necrons).

Next time

In the following post I will hopefully have started on the engine itself, and perhaps even finished the so far ignored floor. The ramp parts will most likely also be finished, and the right passenger side given a few more layers. Will there, however, be something in between? Well, we’ll see, won’t we?

Comments in both English and Norwegian are appreciated!


Game Review – Warhammer 40,000: Fire Warrior

My oldest 40K-game is the intense first-person shooter Fire Warrior.   

In-game firefight, the Greater Good shall prevail! Image: THQ

 
Produced by: THQ
Category: FPS
Released: 2003

Image: Amazon.co.uk

 
Just to get one thing straight from the very beginning: Starting up this game for the first time in 2010 will probably have you staring in disbelief at the 7 years long time-travel in graphical technology that it represents. 7 years backwards in time, that is. To put it short, the graphics LOOK old because they ARE old. But who cares?! You are controlling a Tau Fire Warrior that is able to wield pretty much any Tau and Imperial hand-held weaponry in existence, what more could a fan of Warhammer 40K want? Well, an authentic story and environment, lots of action and brutal violence should also be compulsory ingredients in a good 40K-game. Fire Warrior delivers all of this; The story is well-told and true to Games Workshop’s universe, and the areas you visit in the game are varied and, from time to time, quite impressive in both scale and detail. Still, there are games from 2003 that tend to look a lot “newer” both graphics- and physics-wise. Movement tends to look very mechanical, and some of the textures are a bit simple.


Much of the environment looks quite impressive, especially the gothic Imperial buildings. Image: THQ

But, as I’ve stated earlier, you shouldn’t let the graphics distract you too much. The game is intense enough that you’ll be spending most of your time consentrating on the enemy. If you have read some of my earlier posts you’ll know that I support the Imperium, so killing Guardsmen and even Space Marines is not my favourite aspect of the game. Which makes it even more fun when Chaos enters the fray, and becomes the new enemy.

This, however, brings me to the main flaw of the game as I see it: You are ONE Fire Warrior killing DOZENS of Astartes, Chaos Marines, Raptors and even Daemons. ALONE. On your FIRST mission EVER! For an outsider this might seem okay, but 40K-fans all know that a Fire Warrior needs some luck to take down even one Space Marine. I guess you can simply turn up the difficulty, but that doesn’t change the goal of the game! I generally like the weapons design, but a few of them are still either underpowered or functions in a weird way. The boltgun, for example, has a very low firing rate. This is fine for when you use it yourself, considering the weight and recoil, but the Astartes should be able to fire it on full auto. Besides, the bolt rounds act like slow-moving missiles, so I suppose THQ either wanted to make a sort of “machine rocket-launcher”, or they made them slow so you would have a chance to dodge. I guess the game would be too difficult otherwise, realisticly difficult. 

Taste plasma fire Daemon-spawn! Most of the weapons are very well designed. Image: THQ

Even if the goal might not completely justify the means, in the sense that some Warhammer 40K-authencity has been sacrificed, the game is nonetheless extremely fun to play. Maybe if the fighting was less individual, if your allies actually followed you around instead of staying put, or, you know, DYING so friggin’ easily, then the expected accomplishment would have simply been more realistic. Or at lest somewhere a little closer, we wouldn’t want  to lose the genre’s over-the-top charm, now would we? I would’t bother to review this game from a regular gamer’s point of view, so all that I’ll say is that if you’re both a 40K-fan and likes action games, this is something worth checking out. If you haven’t already, that is. We don’t have THAT much to choose from…

Comments in both English and Norwegian are appreciated!


Painting: Land Raider Crusader – Part 3

In the middle of christmas shopping and reading for this semester’s last test, the Land Raider interior still gets it’s share of attention.

The interior is starting to look more realistic and habitable.

The Painting: Land Raider Crusader posts

Painting: Land Raider Crusader – Part 1
Painting: Land Raider Crusader – Part 2
Painting: Land Raider Crusader – Part 4
Painting: Land Raider Crusader – Part 5

Painting: Land Raider Crusader – Part 6
Painting: Land Raider Crusader – Part 7

Finally, the main wall colour is complete on all interior pieces (except the plates framing the engine in the back, I just recently discovered). And so only detail painting remains, I’m reeeeeally looking forward to a certain side-door piece that has at least 12 different screens and a host of buttons. I’ll probably be asking for some input on that when the time comes, but for the time being; why not take a quick look at my current progress?

You’ll see that I have not yet cleaned up the first piece, simply to show you how bad it looks before a good clean-up with Chaos Black and Black Ink. Otherwise, that stage of painting is finished, also on the inner side of the assault ramp (see main picture). The second piece has been through some highlights and a thorough wash of the metallics. The parts that were simply Boltgun Metal now looks much more realistic, and just a tad corroded. A highlight of Chainmail will finish the job. The altar shelf, with the candle-stands, was base-layered with Tin Bitz (see previous post) and highlighted with Brazen Brass and finally Shining Gold. Only then was the wash applied.

“But what KIND of wash are you applying, that makes the metal look so unbelievably awesome?”, I can hear you crying out (right?). Well, it’s supposed to be this big secret, but perhaps I’ll consider sharing it when my site reaches 1000 views? Or simply 10 “likes” on this post will do, I am susceptible to flattery in most known forms.

The seats were highlighted with a 2:1 mix of Dark Flesh and Bestial Brown (more highlights to come). Some blending was attempted to seamlessly merge the highlight with the basecoat, but I wasn’t all that successfull. Some more practise needed with that technique, I suppose. The lamp was highlighted by adding increasing amounts of Skull White to the mix with Sunburst Yellow. Some of this was carefully drybrushed onto the wall to increase the illusion of the lamp being lit. Same thing goes for the single burning candle. The candles themselves were highlighted with a 1:1 mix of Red Gore and Blood Red, and then simply Blood Red.

Basic tips n’ tricks

When highlighting, aim for the most protruding areas, and avoid parts that are obscured or would be in shadow from a vertical light source. Extreme highlighting means adding a very light colour (often light gray or white) to hard edges or sharply protruding objects, simply to define the edge. A basic example would be adding an extreme highlight of Mithril Silver to a metallic object where the brightest highlight is otherwise Chainmail. The brighter the final highlight – the more contrast on the object.

Next time

The next painting session will be about cleaning up the first piece, finishing the second and probably starting on the engine piece. But before that I might just toss in the first in a series of Warhammer 40, 000 game reviews, so stay tuned!

Comments in both English and Norwegian are appreciated!


Painting: Land Raider Crusader – Part 2

After a far too long period of inactivity, I’m back with a fresh painting post. The Land Raider interior is a few steps closer to completion.

A little more detail than last time, eh? And a different paint station.

The Painting: Land Raider Crusader posts

Painting: Land Raider Crusader – Part 1
Painting: Land Raider Crusader – Part 3
Painting: Land Raider Crusader – Part 4
Painting: Land Raider Crusader – Part 5
Painting: Land Raider Crusader – Part 6
Painting: Land Raider Crusader – Part 7

First of all, I’ll be completely straightforward about the reason for the long delay since last post. I had an exam last week, so that, and the party that followed (at my house), sort of distracted me from painting. And so the 2-3 days I said it would take turned into, well, 9-10. But now I’m back, fit for fight and just recently finished with the latest stage of painting, take a look:

The first two pictures show you the very first layer of paint, that I actually intended to show you last time. Sort of looks like a camo pattern, huh? I’ll talk more about it further down. In the last two pictures you can see that I’ve completed the basic layer on pretty much everything that is not to remain black. The numerous metal studs are simply to be lightly “pricked” with Chainmail, but not just yet. The reason? Because accidentally wiping the paint off these studs will occur FREQUENTLY when handling the piece/model, no matter how careful you are. Leave them unpainted until you are ready to apply a layer of varnish.

Next, the lamp on top of the middle console has its basic layer of Sunburst Yellow, and will be built up by mixing in more and more Skull White. Same thing goes for the flame on the candle, but I probably won’t bother with more than one highlight here. The metal will get my “super secret” metal-wash, and then be highlighted with Chainmail. The seats are painted Dark Flesh, candles Red Gore and candle-stands Tin Bitz. These highlights will all be featured next time. By the way, any ideas of what I could paint inside the little shrine with the two candles? I guess it won’t be visible when the model is assembled, but I’m up for a challenge none the less, and a picture of the result is the only evidence I need.

Basic tips n’ tricks

About the very first layer, seen on the first pictures: You’ll see that the colour itself is uneven, but the layer is nonetheless quite smooth. This is all thanks to the paint being watered down, so even though it is a foundation paint, I will, obviously, still need another layer. Using one, thick layer will result in an uneven, rough surface. All the metallic parts have been given a layer of Boltgun Metal,  but not using a drybrush as I would on a Necron model. Some painters might be content with simply adding a highlight to this, but shading the metal using a wash of different inks will give you a much more realistic result. More on this next time.

One other thing: I’m out of town, and didn’t bring my finished miniatures, so don’t expect any additions to the model gallery until next week. My apologies people.

Comments in both English and Norwegian are appreciated!